Microsoft's Trustworthy Computing initiative celebrated its 10th anniversary in 2012. Many diligent companies have adopted secure software development life cycles aimed at delivering more secure products or protecting their own assets. These initiatives are "front-end" heavy, that is to say, they invest significant time and resources in the early stages of development through security threat modeling, code reviews, penetration testing, and the like -- all in an attempt to build more secure products from the start -- the front-end.
For all the value these front-end efforts provide, they aren't perfect. Complex systems can be difficult for even experienced experts to fully understand. Trust boundaries too often aren't. Applications aren't always accurately decomposed. Threats may be missed or under-estimated. Despite their best efforts, organizations still find themselves compromised and having to respond to breaches. Nevertheless, I have no doubt the problems would be worse if these organizations weren't investing in these front-end activities.
Given the inevitability of breaches, many organizations should focus some portion of their SDLC-like initiatives on the "back-end" of security -- the incident response, investigation and remediation side. Having an IR plan is a start, dedicated head-count for IR is a good step, but think beyond that. If you have an IR team but don't give them the tools to do their job effectively, the costs of inefficient investigations and inadequate remediations add up quickly.
Many organizations invest on the front-end to build secure systems. Mature organizations recognize that even their best efforts will fail and they make investments to build systems that facilitate incident detection, response and remediation.
Go ahead and threat model your apps, review the code, pen test them, but go beyond that. Design applications to log information that will be meaningful for incident responders. Design your systems to forward logs to secure locations where they can be reviewed by automated systems and manually using efficient interfaces. Architect your information systems to facilitate efficient investigations. Enable your investigators with tools for collecting data from hundreds, thousands, tens of thousands of systems worldwide. Plan your deployments for maximum efficiency, but remember when the shit hits the fan, some cycles will be needed for investigations, factor that in to your capacity planning.
Security debt doesn't just come from bugs in your code. If you're not designing your systems to make investigations efficient, you're accruing debt that will eventually come calling.
Wednesday, November 27, 2013

Sunday, March 3, 2013
Dump the schema for Windows Security Events
Here's a useful Powershell one-liner for getting at the Windows Security Event Log schema:
(get-winevent -listprovider microsoft-windows-security-auditing).events
You may want to save the output to a varialbe:
$events = (get-winevent -listprovider microsoft-windows-security-auditing).events
Here's an example of the output:

Friday, August 31, 2012
Research and tools not certs
People ask me about certifications and whether or not they will be beneficial, either in terms of knowledge gained or for career advancement.
In the '90s, I worked with "paper tigers" who were no more effective than those with real world experience, this shaped my opinion of certs. This changed for me when I had a co-worker trying to get his CCIE. He was good and had passed a number of exams, but failed one and was going to have to take it again. After several conversations he convinced me to study for the OCP. At the time, I'd been doing Oracle DBA work for a few years.
I bought the books and began studying and within days, I learned things that made me more effective. There were commands and scripts in the books that made me realize how much I didn't know and they made me a more effective DBA. That experience changed my mind about certs and though I never did get my OCP, I did see the value in studying for certification exams.
But I do not think that having a string of letters after one's name is important, though I have been guilty of putting alphabet soup in my .sig.
I'm more inclined to agree with what Timmay said in his Skytalk at Def Con this year, if you want to get a great job in info sec you don't need certifications, instead spend your time becoming a badass in your field.
Rather than spending your time proving that you know the answers to things that thousands of other people know too, why not spend your time publishing original research and tools in support of that research -- tools that will improve the community?
Here's how I rank the ways to build your reputation and land a great job in info sec:
- Publish original research in your area of interest via blog posts.
- Create new tools that help others, these can be by-products of your research.
- Submit and deliver great talks at conferences or local groups (HTCIA, Infragard, ISSA, etc.) also by-products of research and an opportunity to demo your tools and network.
- Participate in public forums in your area of interest in a helpful way (don't be a douchebag).
- Acquire certifications.
You may look at this list and say, "I’m not a developer or I don’t
have ideas for original research." Start. Learn what others in the field already
know and apply their techniques, methods and tooling. Pick a
programming language, Python, Ruby and Perl are all fine choices and there’s a
large body of open source, security related code written in these languages so
you’ll have a nice base you can review and learn from. As you study the
techniques and tools of others, you will eventually hit a wall where the amount
of published information about a thing drops off or just doesn’t agree with
your own experience, maybe the published information is wrong or maybe few
people have explored what it is that you’ve encountered. You will eventually
reach the limits of the known and in our field, this won’t take that long. You’ll
have questions that you can’t find answers to -- an area ripe for research
and publication.
Some of these things may be big undertakings requiring hours
of work and considerable development effort. Some things may be
simple command line techniques that other people already know but never
published because they were too obvious. Whatever, document them in a blog post
and publish them. You may save people hours of time in the future.
We all stand on the shoulders of giants in this field (though I normally stand on their toes). If you
want to build up your reputation, do it by learning and sharing what you learn
with others. I'd much rather see a resume cross my desk with a list of interesting blog posts containing original research and tools than one that lists a bunch of certifications.
Wednesday, February 22, 2012
Plotting photo location data with Bing
A couple weeks ago, the Girl, Unallocated blog published an article called "Geolocation From Photos = Good Stuff." Her post got me thinking about writing a little bash one-liner to use exiftool to extract GPS coordinates and submit them to an online mapping service to pin the location where the photo was taken. In few minutes, I had a working solution and decided I'd blog about it as soon as I had time.
Time was short.
A little more reading, and I saw that Cheeky4n6Monkey was similarly inspired and accordingly, worked up a better solution than my bash one-liner. Very nice.
Over the last few evenings, I had some time to read up on GeoRSS, an XML document format that can be read by Microsoft's Bing Maps. In turn, Bing can drop pushpins in the GPS coordinates provided from the file. I have a working prototype for this. Now, right off, I have to say, I barely know enough to make this work, the solution is not robust. I did use the word "prototype."
But, I did get it working and I think it may be useful to investigators who want to take images off of a phone or GPS equipped camera and create a map showing where all the images were taken. Here's a walk through.
First, I started with SIFT 2.12 and wrote a Python script that would parse out the EXIF metadata from a collection of photos and write them to a GeoRSS file. The script borrows a bunch of code from http://stackoverflow.com/questions/208120/how-to-read-and-write-multiple-files and http://eran.sandler.co.il/2011/05/20/extract-gps-latitude-and-longitude-data-from-exif-using-python-imaging-library-pil/.
I turned on "Location Services" for the camera on my phone and snapped a bunch of pictures over a few days, then copied these to my SIFT system. Here's the directory listing:
To create the GeoRSS file, simply run the "photo_map.py" script with the files as an argument, like so:
Update: the code in photo_map.py is available in my git repo as exif2georss.py. Again, it is nearly all based on code taken from the links mentioned previously.
Now, here's where a good developer is really needed, someone like the guy behind "Ricky's Bing Maps Blog". He's done all the heavy lifting, creating a tool that can read our GeoRSS file and put pushpins on a Bing map for each set of GPS coordinates. You can download his code and build your own tool for doing this, but if you just want a quick solution that works, open Internet Explorer and go to maps.bing.com:
Notice under the stylized "bing" logo in blue where it says "Maps" in orange? Right below that there is an image of a car and a row of menu options, one of which is "Map apps." If you click on "Map apps," you'll see this:
At the top of this window there is a search box. In that box, type in "georss" without the quotes. Duh. You should be presented with this:
Click on "Ricky's Data Viewer" and you'll see something like this:
Click on the "GeoRSS" tab and you'll see this:
Select your file:
Now we can see a pushpin for every location where a photo was taken:
That's it for my prototype code. Again, this could be taken further with more time and effort. According to the docs for Bing, these mouseover events can be modified to show more data. For example, it may be possible to add the timestamp information to the pushpins and have that appear on the mouseover. And of course you can zoom in to the map and get a better idea of where a cluster of photos was taken, by default Ricky's code centers the map over the collection.
Time was short.
A little more reading, and I saw that Cheeky4n6Monkey was similarly inspired and accordingly, worked up a better solution than my bash one-liner. Very nice.
Over the last few evenings, I had some time to read up on GeoRSS, an XML document format that can be read by Microsoft's Bing Maps. In turn, Bing can drop pushpins in the GPS coordinates provided from the file. I have a working prototype for this. Now, right off, I have to say, I barely know enough to make this work, the solution is not robust. I did use the word "prototype."
But, I did get it working and I think it may be useful to investigators who want to take images off of a phone or GPS equipped camera and create a map showing where all the images were taken. Here's a walk through.
First, I started with SIFT 2.12 and wrote a Python script that would parse out the EXIF metadata from a collection of photos and write them to a GeoRSS file. The script borrows a bunch of code from http://stackoverflow.com/questions/208120/how-to-read-and-write-multiple-files and http://eran.sandler.co.il/2011/05/20/extract-gps-latitude-and-longitude-data-from-exif-using-python-imaging-library-pil/.
I turned on "Location Services" for the camera on my phone and snapped a bunch of pictures over a few days, then copied these to my SIFT system. Here's the directory listing:
 |
| Figure 1: Directory listing of a bunch of images from an iPhone and the script to parse them |
To create the GeoRSS file, simply run the "photo_map.py" script with the files as an argument, like so:
 |
| Figure 2: Running the photo_map.py script against all the JPG files and redirecting the output to the xml file |
Update: the code in photo_map.py is available in my git repo as exif2georss.py. Again, it is nearly all based on code taken from the links mentioned previously.
Now, here's where a good developer is really needed, someone like the guy behind "Ricky's Bing Maps Blog". He's done all the heavy lifting, creating a tool that can read our GeoRSS file and put pushpins on a Bing map for each set of GPS coordinates. You can download his code and build your own tool for doing this, but if you just want a quick solution that works, open Internet Explorer and go to maps.bing.com:
 |
| Figure 3: Internet Explorer with maps.bing.com loaded |
Notice under the stylized "bing" logo in blue where it says "Maps" in orange? Right below that there is an image of a car and a row of menu options, one of which is "Map apps." If you click on "Map apps," you'll see this:
 |
| Figure 4: What you should see after clicking on the "Map apps" button |
At the top of this window there is a search box. In that box, type in "georss" without the quotes. Duh. You should be presented with this:
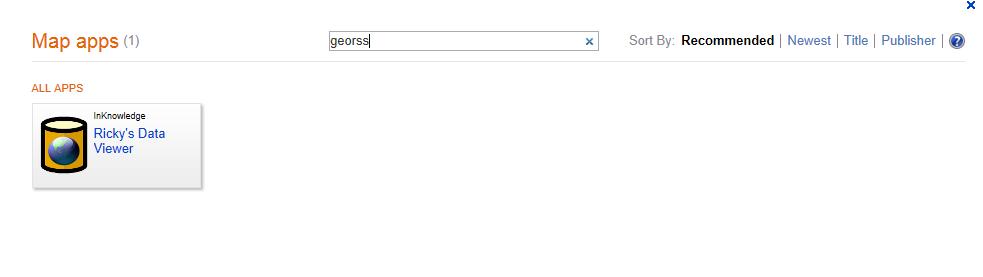 |
| Figure 5: Showing Ricky's Data Viewer, which will read our GeoRSS xml file and plot the GPS coordinates! |
Click on "Ricky's Data Viewer" and you'll see something like this:
 |
| Figure 6: Bing's map now has Ricky's Data Viewer on the side. Note the "GeoRSS" tab. |
Click on the "GeoRSS" tab and you'll see this:
 |
| Figure 7: Enough screen shots yet? Now we can select our GeoRSS file that we created earlier. |
Select your file:
 |
| Figure 8: Navigate to your file (it's on my SIFT share) and click Open. Here comes the magic... |
Now we can see a pushpin for every location where a photo was taken:
 |
| Figure 9: Pushpins representing locations where photos were taken. Mousing over the pin shows the photo file name. |
That's it for my prototype code. Again, this could be taken further with more time and effort. According to the docs for Bing, these mouseover events can be modified to show more data. For example, it may be possible to add the timestamp information to the pushpins and have that appear on the mouseover. And of course you can zoom in to the map and get a better idea of where a cluster of photos was taken, by default Ricky's code centers the map over the collection.
Thursday, February 9, 2012
Retrograde Detection for Chrononauts
Many enterprises deploy web filtering technologies. In too many shops this is done only to prevent pervs with little self-control from creating a hostile work environment by getting their fetish fixes from the confines of their cubicles.
For incident response teams these technologies have a more important purpose than denying deviants access to the inappropriate. Given that many malware variants use HTTP/S (or the ports for those protocols) for command and control (C2) and data exfiltration -- it's a great way to blend in with the noise of allowed web traffic -- these web content filtering tools can be put to good use both preventing and detecting malicious traffic.
Many of the content filtering tools automatically block known-malicious web sites out of the box. In my experience putting together your own lists of malicious sites can give you additional protection. You can build your own lists based on publicly available sources (e.g. http://www.malwaredomains.com/, http://www.malwareurl.com/, http://bit.ly/xSO8rx, etc.), on your own intel gathering from analyzing malware found in your environment and if you run in certain circles, you may have access to government classified lists.
Over the last few years, commercial full-packet capture solutions have begun making inroads in the enterprises that can afford them. Some environments store this data and play it back later through IDSes after updating signatures to see if those devices now catch anything that they may have missed previously.
This same principle applies with web content filtering data. Rather than playing back the data, simply normalize and store the domains and IP addresses that devices in your network have communicated with over the last n months and periodically query your malicious domains data set to see which of those domains and IPs may have been overlooked because they were not known to be malicious at the time devices in your network were communicating with them.
Will you get some false positives from this? Undoubtedly, but you may also gain some insight into problems that you didn't know you had previously -- maybe a footnote to tuck into next quarter's 10-Q.
For incident response teams these technologies have a more important purpose than denying deviants access to the inappropriate. Given that many malware variants use HTTP/S (or the ports for those protocols) for command and control (C2) and data exfiltration -- it's a great way to blend in with the noise of allowed web traffic -- these web content filtering tools can be put to good use both preventing and detecting malicious traffic.
 |
| Photo Source: http://www.flickr.com/photos/eneas/3471986083/sizes/z/in/photostream/ |
Many of the content filtering tools automatically block known-malicious web sites out of the box. In my experience putting together your own lists of malicious sites can give you additional protection. You can build your own lists based on publicly available sources (e.g. http://www.malwaredomains.com/, http://www.malwareurl.com/, http://bit.ly/xSO8rx, etc.), on your own intel gathering from analyzing malware found in your environment and if you run in certain circles, you may have access to government classified lists.
Over the last few years, commercial full-packet capture solutions have begun making inroads in the enterprises that can afford them. Some environments store this data and play it back later through IDSes after updating signatures to see if those devices now catch anything that they may have missed previously.
This same principle applies with web content filtering data. Rather than playing back the data, simply normalize and store the domains and IP addresses that devices in your network have communicated with over the last n months and periodically query your malicious domains data set to see which of those domains and IPs may have been overlooked because they were not known to be malicious at the time devices in your network were communicating with them.
Will you get some false positives from this? Undoubtedly, but you may also gain some insight into problems that you didn't know you had previously -- maybe a footnote to tuck into next quarter's 10-Q.
Saturday, February 4, 2012
Finding Evil: Automating Autoruns Analysis
You can buy appliances to put in your network in an effort to find evil on systems in your enterpise. I know a wicked smart individual who develops one such system and I strongly recommend you check them out, especially if you can afford them. The one I'm thinking of rhymes with "beer."
But let's say you didn't budget for one of these systems this year, there's still something you can cobble together using Autoruns, Psexec, Cygwin and VirusTotal. It may not be as effective or capable as the system that rhymes with "beer," but it's going to be useful. Let's get to it.
I've written about Autoruns before so if you're not familiar with it, check out the link above and this post about how attackers maintain persistence. Psexec is another Microsoft Sysinternals tool that you can use to execute commands on remote hosts. If you're an incident responder or system administrator, having the ability to "psexec" into remote systems is a must.
Cygwin is "a collection of tools which provide a Linux look and feel environment for Windows." If you follow the outstanding, Command Line Kung Fu Blog, you know well that what's relatively easy at the command line in Linux can be far more difficult to achieve using built in tools in Windows. Installing Cygwin will facilitate our little project here. Alternatively, if you have a Linux box, you can use it instead.
VirusTotal is a great service where you can upload binaries and have them scanned by 40+ antivirus tools to see if any of them recognize the binary as something malicious. Too many people don't know that in lieu of uploading a binary to VirusTotal, you can take an MD5, SHA1 or SHA256 hash of a binary and search for that value on the site. VirusTotal will return a report showing how many antivirus scanners recognize a file with that same hash as a malicious file. See the footnote at the end of this article for a reason why you may not want to immediately upload suspicious binaries to VirusTotal for analysis.
Conveniently, Autoruns can be configured to generate MD5, SHA1 and SHA256 hashes. Combine that chocolate, with the flavor that is VirusTotal and you've got yourself a nice bit of kit for finding evil. Where do Psexec and Cygwin fit into this? With Psexec and a for loop, we can collect Autoruns data from many hosts in a few minutes. Mind the wraps.
for /L %i in (1, 1, 254) do @psexec -s -n 4 -d \\n.n.n.%i cmd /c "net use o:
\\server\share PASSWORD /user:doman\username &&
\\live.sysinternals.com\tools\autorunsc -a -v -f -c '*' >
o:n.n.n.%i.csv && net use o: /delete"
Let's break this down. First the for loop is going to count from 1 to 254 and assign that value to the variable %i. Within the loop we run psexec with -s -n 4 and -d options, these will run commands on the remote system as SYSTEM, timeout after 4 seconds if it can't connect and lastly, -d runs the commands non-interactively, think of it as -d for "dropping" the command on the system and moving on.
Next is the IP address of the remote host -- \\n.n.n.%i. You can run this loop inside another loop to cover more than one octet at a time (i.e. \\n.n.%j.%i and so on). Next comes the command we want to run on the remote host, in this case it is a compound command (i.e. a command shell followed by another command (i.e. cmd /c...)). In this case, the compound command that follows first maps a drive to some share somewhere in your environment, this may require that you supply credentials, depending on how your environment is configured.
Having mapped the drive, we call Autorunsc (note the trailing c there indicates the command line version). The flags and arguments provided here, -a -v -f -c '*', have the following effects respectively: collect all Autoruns, verify certificates for signed code, create file hashes, write the output as comma separated values and lastly gather Autoruns data for all profiles on the system. We redirect the output to the drive that we mapped, naming the file for the IP address of the system that it came from and lastly, we delete the drive mapping.
Depending on how you do this, you'll have a single system's Autoruns data or the data from many systems. Now we want to analyze all of this data to see if we can find any malicious binaries in the mix. Since we told Autorunsc to verify signed code, we can make a possibly horrible decision and direct our attention to only the unsigned code. The assumption here is that only legit code will be signed and that malicious code will be unsigned. There have been examples of malicious code that was signed and I suspect the future will bring more and more of the same. But for demonstration purposes, I'm only going to analyze unsigned code.
If you have a single Autoruns output file, rename it to aruns.csv and drop it into the same directory as the following script, which you can download from my git repo [RECOMMENDED]. You'll need Cygwin or a system with bash, grep, awk and wget for this:
If you have a bunch of Autoruns output from multiple hosts, you can combine them with a little command line foo as follows:#!/bin/bash # A working proof of concept, lacking many features # Remove old VirusTotal results files=$(ls *.html 2>/dev/null | wc -l) if [ "$files" != "0" ]; then ls *.html | xargs rm -rf fi # Gather all hashes for unsigned code from autoruns csv output file named aruns.csv grep -i "(Not Verified)" aruns.csv | awk -F, '{print $(NF-2)}' | sort | uniq > aruns_hashes # Reduce the data set to hashes that aren't in our good list if [ -e hashes_cleared ]; then grep -vif hashes_cleared aruns_hashes > hashes2check else mv aruns_hashes hashes2check fi # Should create a list of bad hashes and check against it too if [ -e hashes_evil ]; then grep -if hashes_evil hashes2check > aruns_malware_hashes fi # Remove malware hashes from hashes2check if [ -e aruns_malware_hashes ]; then grep -vif aruns_malware_hashes hashes2check > vtsubmissions else mv hashes2check vtsubmissions fi # Search VirusTotal for reports on remaining hashes echo "[+] $(wc -l vtsubmissions) hashes to check with Virus Total" sleep 2 for i in $(cat vtsubmissions); do wget --header= -O $i.html --no-check-certificate \ https://www.virustotal.com/latest-scan/$i; sleep 15; done # Check results for malware grep -l "[1-9][0-9]* / " *.html | awk -F. '{print $1}' | tee -a aruns_malware_hashes \ >> hashes_evil # Pull out malware entries from aruns.csv grep -if aruns_malware_hashes aruns.csv > aruns_malware # Check results for non-malicious files grep -l "0 / " *.html | awk -F. '{print $1}' >> hashes_cleared # Check for results tnat are unknown to VT grep -li "not found" *.html | awk -F. '{print $1}' > unknowns # Pull unkown entries from aruns.csv grep -if unknowns aruns.csv > aruns_unknown # Report results let j=$(wc -l aruns_malware) echo "[+] VirusTotal shows $j Autoruns entries may be malicious." echo "[+] Check the aruns_malware file for details." let j=$(wc -l aruns_unknown) echo "[+] VirusTotal has never seen $j Autoruns entries." echo "[+] Check the aruns_unknown file for details." echo
cat n.n.n.* | sort | uniq > aruns.csvYou'll need to edit this aruns.csv file and remove the header line created by Autorunsc, search for MD5 to find the header line. Now place that file in the same directory as the script above and you'll be all set.
What does the script above do? It pulls out all of the MD5 hashes for unsigned Autoruns, compares them against a list of known good hashes from previous runs, if this is your first run through with the script, the file won't exist and this will be skipped. Next it compares those hashes against hashes of known malicious files, again, if this is your first run, there will be nothing to compare against and this step will be skipped. Known malicious hashes will removed from the list and saved for later notification. Whatever hashes are left will be submitted to VirusTotal as search strings at the public API rate of four hashes per minute, the results from VirusTotal will be written to files named for the hashes with .html extensions added.
Once all the hashes have been submitted to VirusTotal, the script will search through all the results looking for any that were reported as malicious by the antivirus products. Those hashes will be written to the same file as any that had previously been marked as malicious.
Then the script looks through the html files for results where none of the antivirus products found the hash to match a malicious file, these hashes are saved into the hashes_cleared file and they will not be submitted to VirusTotal on future runs.
The script then searches through the results from VirusTotal for any reports that indicate no file with the provided hash has been submitted for analysis. These hashes are marked as unknowns and may warrant further analysis, possibly even submitting the files to VirusTotal (see the footnote below).
Finally, the script reports to the user how many of the hashes were reported to match malicious files and how many were unknown. It pulls these Autoruns entries from the aruns.csv file so you can have the reduced data set for analysis.
Below are some screen shots of the script, which I'm calling "lamelyzer.sh," pronounced lame-ah-lyzer:
 |
| Figure 1: lamelyzer's first run as evidenced by the lack of data files. |
 |
| Figure 2: lamelyzer reports there are 114 hashes to submit to VirusTotal and begins making requests |
 |
| Figure 3: Directory listing while lamelyzer is in progress. Each html file is a VirusTotal report. |
 |
| Figure 4: lamelyzer has finished and is showing results. |
 |
| Figure 5: Post execution directory listing of non-html files. |
Figure 5 shows a directory listing after the lamelyzer script has finished. When we started there were two files, the script itself and the aruns.csv file. Now we have several new files, aruns_malware will contain the Autoruns entries that some antivirus product recognized as malicious; aruns_malware_hashes contains the hashes for those files; aruns_unknown contains those Autoruns entries that had MD5 hashes that didn't match any files that VirusTotal had seen before, these may warrant further investigation; hashes_cleared contains a list of hashes that have been scanned by antivirus products at VirusTotal and the results came back clean, in future runs, hashes matching entries in this file will not be submitted to VirusTotal; hashes_evil contains the hashes for files that VirusTotal said were malicious, in future runs hashes matching entries in this file will not be submitted to VirusTotal, they will however be reported to the user; unknowns contains the hashes for files VirusTotal hasn't seen before; and vtsubmissions contains the list of hashes that were submitted to VirusTotal.
On subsequent runs hashes will be appended to hashes_cleared and hashes_evil as appropriate. All the other data files will be overwritten. If you want to see what VirusTotal says about a particular file, open the corresponding html file in a web browser. When you're finished reviewing the results, delete the html files. The next time you need to analyze Autoruns output, copy it into the directory as aruns.csv and run lamelyzer again. Known good and bad files will be filtered out and reported accordingly, all others will be submitted to VirusTotal with results reported accordingly.
 |
| Figure 6: A subsequent run of lamelyzer with an aruns.csv with 838 entries, only 77 will be submitted to VirusTotal. |
In Figure 6, I've collected another set of Autoruns data from multiple systems, 838 entries in total, but due to the existence of the hashes_evil and hashes_cleared files, only 77 of the 838 entries will have their hashes submitted to VirusTotal.
If you compile many sets of Autoruns data into one aruns.csv file, as I have, you can map a particular entry back to the host(s) that it came from by grepping through the original csv files for the hashes in question. Recall near the beginning of this post, the for loop that wrote Autoruns data to files named for the IP addresses of the hosts they came from, simply grep through those files for the hash in question.
I have to admit that lamelyzer was given its name because it was a hastily assembled proof of concept for a more robust tool I've been working on, but some folks that I'd talked to about it wanted more information on what I was planning to do. Rather than put together slides or whiteboard it, I spent a few minutes putting this script together. It works well enough, that I think many could put it to good use. I will still work on a more robust tool with more options, but wanted to get this out.
If you have any questions or comments, please don't hesitate to let me know.
* There are reasons why you should not immediately upload a potentially malicious file to VirusTotal. If I'm an attacker and I'm targeting your organization, I may create custom malware or repackage some existing malware in such a way that it has a unique set of MD5, SHA1 and SHA256 hashes. Once I've dropped my kit in your network, I can monitor VirusTotal by searching for my hashes. If VirusTotal comes back with a report for any one of those hashes, then I know someone has submitted the binary to VirusTotal (or there's a collision with another file) and therefore, I know that your organization has found my kit and that it's time for me to switch things up.
Thursday, February 2, 2012
Finding DNSChanger Victims
Per Brian Krebs' article about DNSChanger Trojan at least half of the Fortune 500 still has infected hosts. I thought I'd post this quick one-liner that may help some folks find these infected hosts in their networks.
First, find a machine that you know is configured correctly for DNS for the network you're wanting to search. If you're at that machine's console, open a DOS prompt and run the following command (mind the linewraps):
Several people sent me information on IP address for known rogue DNS servers, according to the (unsigned) FBI document here, the rogue DNS servers fall into the following IP ranges:
Feedback appreciated.
 |
| Source: http://www.fbi.gov/news/stories/2011/november/malware_110911/image/dns-malware-graphic |
First, find a machine that you know is configured correctly for DNS for the network you're wanting to search. If you're at that machine's console, open a DOS prompt and run the following command (mind the linewraps):
reg query hklm\system\currentcontrolset\services\tcpip\parameters /s |
The result should look something like this:find "NameServer"
     NameServer         REG_SZ
     DhcpNameServer     REG_SZ    192.168.2.1 192.168.1.1 192.168.253.1
Obviously you may have different IP addresses for your name servers. Verify that the information is correct. Highlight the line in the response that is correct and paste it to your clipboard.
Because my environment uses DHCP just about everywhere and DHCP assigns name server information, I highlight only that line and use a loop as shown below to scan multiple hosts:
for /L %i in (2, 1, 254) do
reg query \\192.168.n.%i\hklm\system\currentcontrolset\services\tcpip\parameters /s |
find "DhcpNameServer" | find /V
Note that the second "find" statement in the command above will only pull out lines that don't match the supplied string. The output from this command will be written to files named for the IP addresses of the devices you are querying, those files that are not zero length, indicate systems that have some DNS setting that doesn't match what you know to be a good configuration. You may have to tweak this a bit for your situation, but you get the general idea." DhcpNameServer REG_SZ 192.168.1.1 192.168.1.2 192.168.253.1" > 192.168.n.%i
Several people sent me information on IP address for known rogue DNS servers, according to the (unsigned) FBI document here, the rogue DNS servers fall into the following IP ranges:
| start range | end range |
|---|---|
| 85.255.112.0 | 85.255.127.255 |
| 67.210.0.0 | 67.210.15.255 |
| 93.188.160.0 | 93.188.167.255 |
| 77.67.83.0 | 77.67.83.255 |
| 213.109.64.0 | 213.109.79.255 |
| 64.28.176.0 | 64.28.191.255 |
Feedback appreciated.
Subscribe to:
Posts (Atom)
Grand Canyon Rim to Rim: New Gear and Best Intentions
I pulled my late 1980s backpack out of storage. My first thought was that it was heavier than I remembered, just over seven pounds empty. Ba...

-
If you're fortunate enough to be running a modern endpoint detection and response (EDR) product or even endpoint protection (EPP), you m...
-
 I pulled my late 1980s backpack out of storage. My first thought was that it was heavier than I remembered, just over seven pounds empty. Ba...
-
My previous posts in this series have touched on the core issues that Sheryl Sandberg addresses in her book Lean In: Women, Work, and the W...